General questions
The Signage Stick serial number can be found via the following ways:
1. The brown box that comes with the stick.
2. If you don’t have access to the box, you may obtain it from the stick settings.
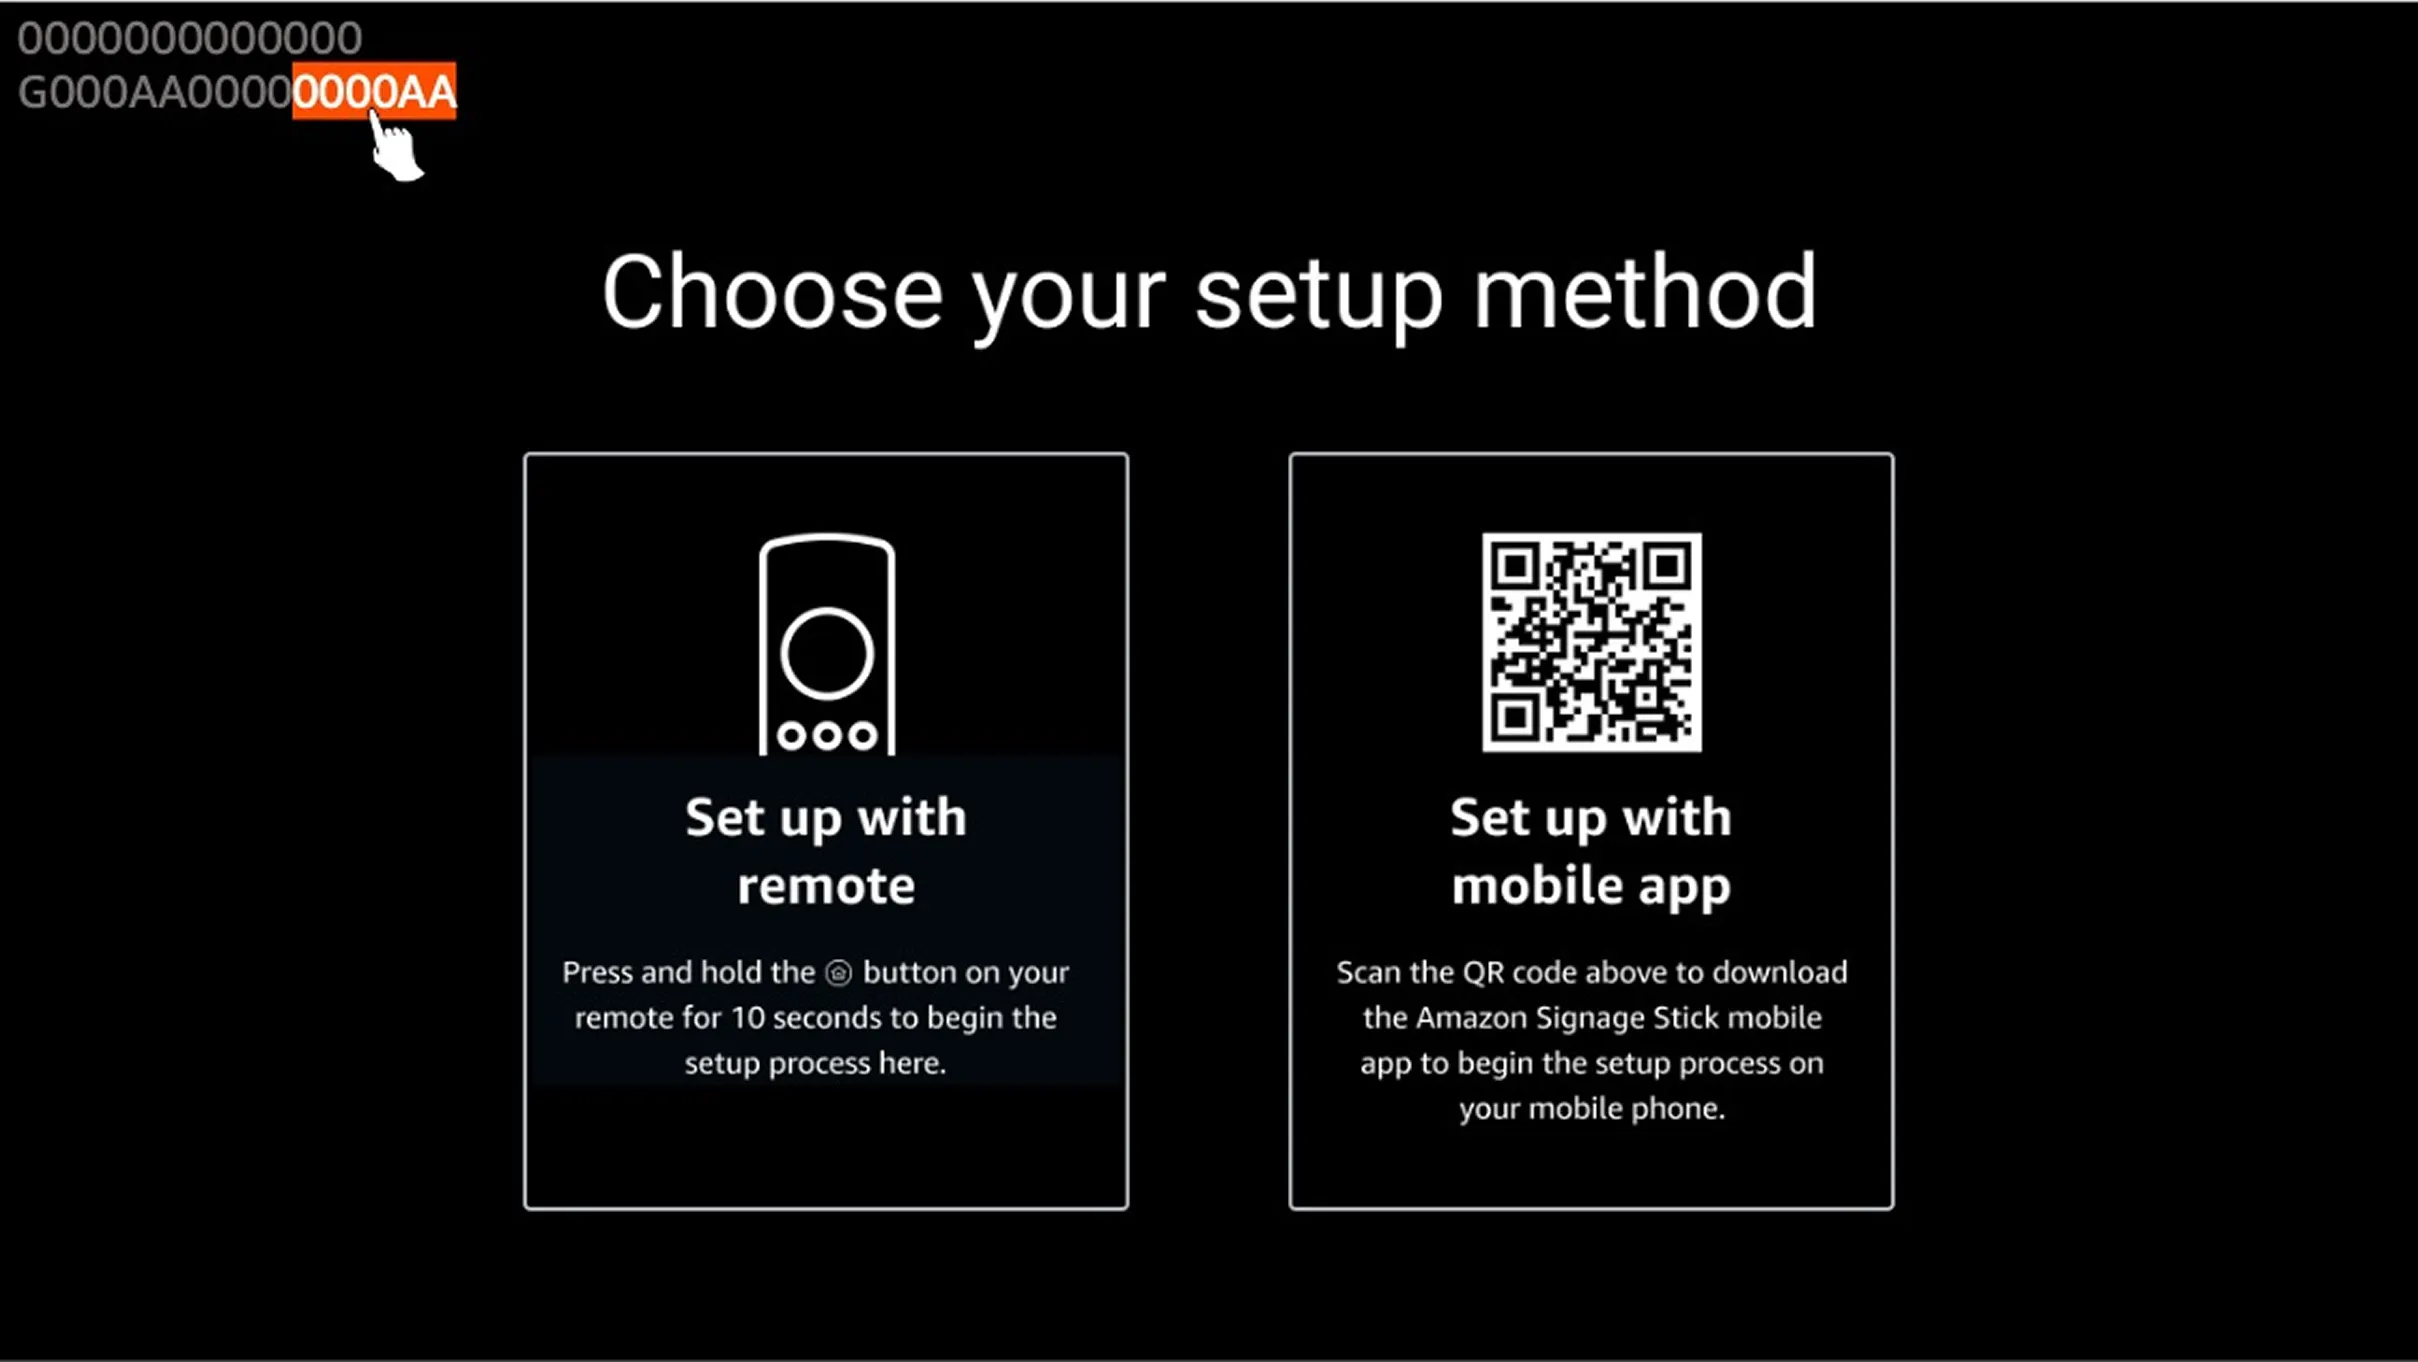
3. If you can’t access the settings and the original packaging for the Signage Stick can’t be found, unplug your stick, wait a few seconds, and plug it back. Once you do that, you will see the screen below. Look at the red circle, you will see the serial number there, on the lower row, starting with the letter G.
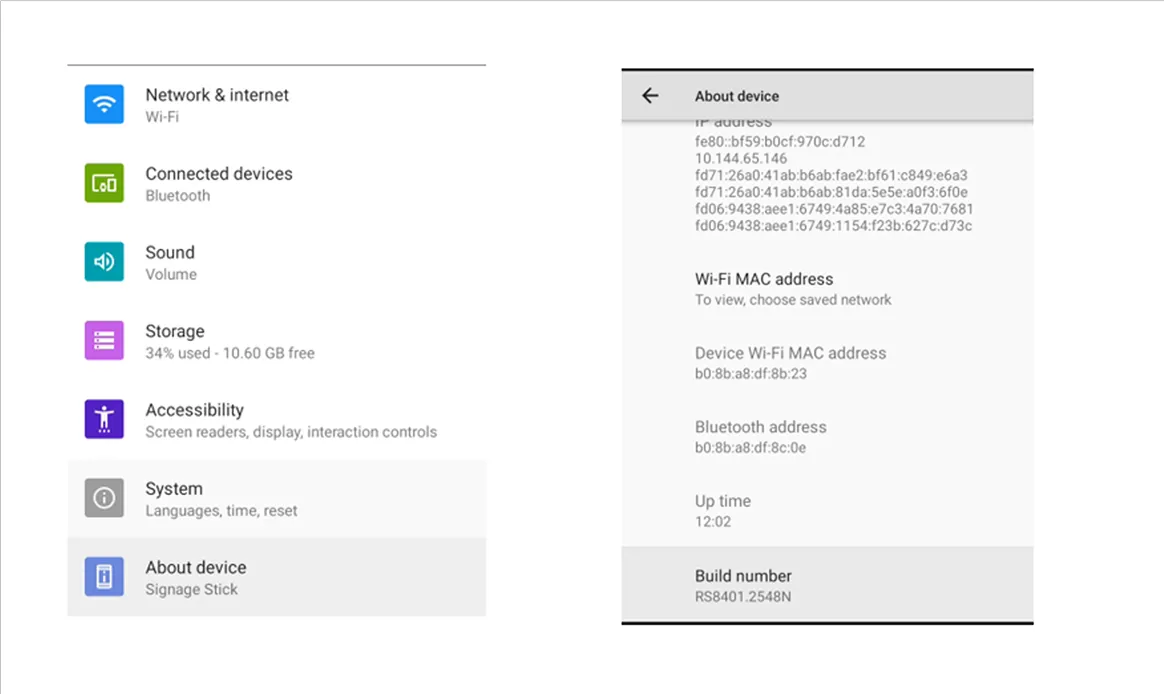
To locate the Device Serial Number (DSN) on your Amazon Signage Stick via remote control:
1. On your remote, press the ⚙️ Settings button.
2. Navigate to About Device.
3. Select Model & Hardware.
4. The Serial number will be displayed on screen.
- It typically begins with “G”, for example:
G073SA0144220068
This issue is commonly caused by browser filters blocking essential login components. To resolve this issue, check if your browser has a filter called Linewize installed as this filter is known to block assets.loginwithamazon.com. On personal devices, you can either disable the filter or add assets.loginwithamazon.com to the allowed sites list. For work/school devices, contact your IT administrator to allowlist assets.loginwithamazon.com. If the problem persists, try using a different browser, clearing your browser cache and cookies, or checking if any other security software might be blocking the connection.
If the button doesn’t respond when clicked, it’s likely that a content filter (like Linewize) is blocking required login services. Make sure the domain assets.loginwithamazon.com is allowed in your browser or network settings. You can also try switching browsers, clearing your cache, or asking your IT team to allow the domain if you're on a managed device.
To make the registration table more manageable and easier to use, you can customize the device names in your Amazon Signage Manager. Here's how:
Access the Amazon Signage Manager:
1. Log in to https://console.signage.amazon.com/
2. Log in to your account if necessary
Customize device names:
1. Locate the "Actions" column in the registration table
2. Click on "Edit Device" for the stick you want to rename
3. Enter a descriptive name that helps you identify the stick (e.g., "Lobby Display" or "Conference Room 2")
4. Save your changes
Additional tips:
* Use a consistent naming convention for all your devices
* Consider including location or purpose in the name
* Update names whenever you move or repurpose a stick
Benefits of customizing device names:
* Easier identification of specific Amazon Signage Sticks
* Improved organization of your Amazon Signage network
* Quicker troubleshooting and management
Amazon Signage Stick is HDCP (High-bandwidth Digital Content Protection) version 2.0 compliant. HDCP is a protection protocol to prevent unlawful recording of video playback. HDCP is a mandatory security feature that cannot be disabled, as it's part of Amazon Signage Stick's compliance requirements. A display without HDCP enabled will result in a black screen.
Using either the virtual remote or the physical remote, open settings by pressing the gear icon and then navigate to "About Device" >>> "Build number."
We take customer data privacy very seriously and adhere to Amazon's comprehensive privacy policies. For information about how Amazon collects and/or uses data, please refer to Amazon Privacy Notice.
Navigate to signage.amazon.com on your mobile device or computer, click "Login to Signage Manager" in the rightmost corner, select “Login with Amazon,” and enter your Amazon account credentials to log in.
For iOS, version 14 or later, Android, version 11 or later.
Setup Questions
There are a couple of factors that could lead to Signage Sticks not being discovered:
- Your Stick is not fully charged yet. Make sure your Stick is connected to a power source, wait for 5 minutes, and then try again.
- Your mobile device may be out of the Stick’s Bluetooth range. Try moving your device within 10 feet of the Stick.
If none of the above works, try unplugging the Stick and then reconnecting it to power. Wait for the Signage Stick to fully restart before rescanning.
No. To set up Signage Sticks with different Wi-Fi credentials/CMS preferences, you will need to complete the setup process separately for each combination of settings.
There are a few situations that can lead to an unsuccessful setup (e.g. Wi-Fi or Bluetooth connection lost, Signage Stick no longer in paring mode).
In most cases, unplugging the Signage Stick, plugging it back in, and repeating the setup process will resolve the issue. Additionally, verify that the Wi-Fi password you entered is accurate. If this doesn’t work, try setting up using the physical remote and Signage Manager Portal. If that fails, please contact support at signage-support@amazon.com.
The app will show a Signage Stick as online as soon as an internet connection is established. However, the Signage Stick may need to update its firmware and install the CMS application, which can take 10+ minutes depending on network conditions.
You can set up multiple sticks at once using the app, but can only set up one at a time using the physical remote with the portal. Using the app, you can also set up sticks before connecting to a display by just connecting to power, which is not possible with the portal. However, regardless of which method you choose, you will be able to manage your Sticks with both the app and the portal after setup.
You’ll need to perform a factory reset of your Signage Stick and restart the setup from the mobile app. To do this, follow the Physical Remote step described under How do I reset a Signage Stick?
Yes, you can view Sticks set up with the physical remote and Signage Manager Portal in the mobile app. The reverse is also true: if you set up Signage Sticks using the app, you can also view and manage them from the web Signage Manager Portal.
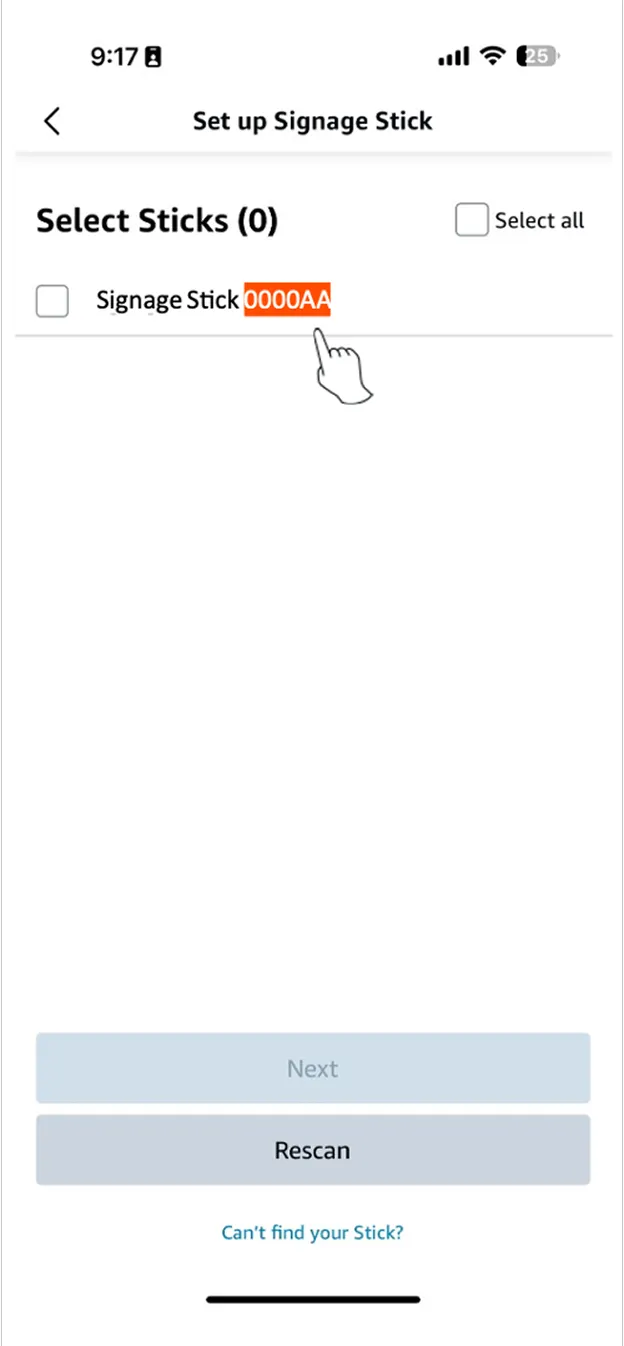
"If your Stick is connected to a display during scanning, you’ll see a 16 digit DSN on the first screen in the top left corner. That last 6 digits will be displayed to identify the Sticks that have been scanned. You can also find the DSN on the outside of the Stick’s packaging.
Try one of the following solutions and then attempt to pair your Stick again by holding the Home button on your remote until "Press button to start" appears on-screen (about 10 seconds):
- Move your remote closer to your stick, within 10ft (3 m).
- Remove the batteries from your remote, wait 30seconds, and put them back in.
- Try using a new pair of alkaline batteries.
- Press and hold the "Left" button, "Menu" button, and "Back" button at the same time for 12 seconds to reset your remote.
- Unplug your Signage Stick, wait 5 seconds, and then plug it back in.
For more troubleshooting information, visit this webpage.
We recommend using a secure network for Stick setup and management to maximize security. However, if you wish to set up a Stick with an open Wi-Fi network (network that does not require a password), you must set up with the physical remote and Signage Manager Portal. The mobile app only supports setup with protected Wi-Fi networks.
If you have access to a protected Wi-Fi network but want your Stick to ultimately use an open Wi-Fi network, you can also use the app to set up with the protected Wi-Fi network and then change it after setup.
Yes. The Amazon Signage Stick automatically caches content locally and continues playback even if the device loses network connectivity.
However, when the Signage Stick is offline:
* Any updates or changes you make to your playlist or media content in your CMS portal will not be reflected on the device until it reconnects.
* Firmware (OS) updates and CMS app updates will not be delivered while offline.
* Once connectivity is restored, the device will automatically sync and resume normal operation.
In summary, your signage content will keep playing seamlessly, but no new updates or changes will appear until the network connection is re-established.
Network Questions
Mobile App:
With your Signage Stick powered on and connected to a screen, launch the mobile app.
Launch the virtual remote [https://signage.amazon.com/support/glossary/virtual-remote] for your Stick.
Tap the "Settings" button on the virtual remote (gear icon). You should see the screen connected to your Stick switch to a settings menu.
On the screen, navigate to "Network & Internet" using the arrow buttons on the virtual remote to move and the "OK" button to select.
Navigate to "Wi-Fi" and select it to enter the Wi-Fi menu.
From the list of Wi-Fi networks, navigate to the one you want to use and tap "OK" to connect.
Physical Remote:
Press the "Settings" button on the physical remote paired to your Signage Stick.
Use the "Select" button on your remote to select "Network & Internet" from the on-screen menu
Use the "Down" button to scroll to "Wi-Fi" and use the "OK" button on your remote to select "Wi-Fi."
Scroll down to find and select your network name.
Enter your Wi-Fi password when prompted.
Signage Sticks have Wi-Fi 6E support for 6 GHz band connections, which prevent the overcrowding of sticks on a Wi-Fi network and allow for faster speeds, increased bandwidth, and less latency.
To get the best performance from your Wi-Fi 6E device:
1. Upgrade to a Wi-Fi 6E or higher Wi-Fi Generation capable router. For larger locations, consider mesh routers for whole location coverage.
2. Configure the router to serve the same network name(SSID) for the 2.4 GHz, 5 GHz, and 6 GHz band.
These changes make your Signage Stick automatically connect to the best performing band available, based on signal strength from the Wi-Fi router.
The MAC address is required to configure your network for MAB, which allows the stick to connect to the network. To connect your Signage stick to the network using MAC Address-Based Authentication (MAB), follow these steps to locate the stick's MAC address:
Using either the virtual remote or the physical remote, open settings by pressing the gear icon () and then navigate to "About Device" >>> "Device Wi-Fi MAC address."
During the initial Amazon Signage setup (OOBE), the Signage Stick can only detect Wi-Fi networks that are broadcasting their SSID. Hidden SSIDs do not appear, hence Signage cannot detect them, via typical set up path.
Recommended Workarounds:
Method 1:
It is possible to turn off your SSID broadcast and set up Signage. You can do this only via remote control.
1. Boot up your signage stick
2. Pair it with your remote control; do not use mobile app.
3. At the time of your network selection, you will not see your network since you have it hidden.
4. Click on “Join Other Network”
5. Type in your Network Name
6. Select the correct security type
7. Type in password
8. Confirm your network configuration
9. Now click on "Connect"
Method 2:
If you'd like to use a hidden network, the following steps will allow you to complete setup:
1. Temporarily unhide the SSID.
2. Complete the device setup and ensure the device is fully adopted into your Signage Console.
3. If desired, you may hide the SSID again afterward.
Method 3:
As an alternative, connecting via Ethernet connection can also be used to mask your SSID.
Here are the domains the Signage Stick will connect to:
The following 4 security types are supported, but only through OOBE. These can’t be selected after a stick has been set up. they can only be selected when going through a Signage Stick set up.
- Enhanced Open --- Adds encryption to open networks without requiring a password.
- WEP (Wired Equivalent Privacy) --- Old encryption method using static keys (40/104-bit).
- WPA/WPA2-Personal (PSK) --- Uses a shared password (“Pre-Shared Key”) for authentication.
- WPA3-Personal --- Successor to WPA2 with more secure handshake (SAE – Simultaneous Authentication of Equals).
%20copy.webp)
WPA/EPA2/WPA3-Enterprise is NOT supported at this time.
- These are enterprise authentication types used in corporate or school networks where you sign in with credentials or certificates instead of a shared password. This security type is not supported at this time.
.webp)
If you are using direct internet connection via ethernet cable and ethernet adapter, make sure your ethernet adapter is not getting power from a TV or a display USB port. Please use the power cable and adapter that come with Signage stick, to connect your ethernet adapter to main power source. TV’s USB ports have limited power output, and we highly recommend using the power adapter and cable that come with Signage sticks.
CMS Questions
A. Download of Android command-line tools
You must download Android command-line tools before you can enable adb:
1. Download Platform Tools from the Google Developer website
2. Extract the downloaded zip file to a location of your choice
3. Recommended: Create a dedicated folder like C:\Android\platform-tools (Windows) or /Users/<username>/Android/platform-tools (Mac)
B. Add Android Debug Bridge to Your Path
You need to add ADB to your PATH so you can more easily run adb commands. (Your PATH is an environment variable used to specify the location of the program's executable. If you don't add ADB to your PATH, running adb commands will require you to browse to the platform-tools directory to run ADB.)
Windows
To add ADB to your PATH on Windows:
1. Get the path to your Android SDK command-line tools directory.
2. Click your computer's search button and type view advanced system settings.
3. Click View advanced system settings.
4. When the System Settings dialog opens, click the Environment Variables button.
5. Under System Variables (the lower pane), select Path and click Edit.
6. Do one of the following:
1. On Windows 7 or 8, move your cursor to the farthest position on the right, type ; and then press Ctrl+V to insert the path to your Android SDK command-line tools folder.
2. On Windows 10, click the New button and add this location.
7. Restart any terminal sessions, and then type adb. If you successfully added ADB to your path, you will see ADB help info rather than "command not found."
MAC
To add ADB to your PATH on Mac:
1. Get the path to your Android command-line tools directory:
2. Use the following command to add ADB to your .bash_profile. Replace <your username> with your actual username.
echo 'export PATH=$PATH:/Users/<your username>/Android/platform-tools/' >> ~/.bash_profile
Your .bash_profile file is usually in your user directory, which you can find by typing cd ~ (change to your user directory). Then type ls -a (list all) to show all files, including hidden ones.
If the file isn't there, simply create one. You can then type open .bash_profile to see the paths listed.
After you add this PATH to your bash profile, you should see the following in your .bash_profile file:
export PATH=$PATH:/Users/johndoe/Android/platform-tools/
(Only instead of johndoe, you will see your own username.)
1. Fully restart any terminal sessions, and then type adb. If you successfully added ADB to your path, you will see ADB help info rather than "command not found."
C. Set up Signage Stick with a CMS app
Now, you need to set up your Signage Stick and select one of the CMS apps, any of them, to complete the OOBE. This step is needed in order to access Signage Stick settings to enable adb.
D. Enable adb on Signage
To enable adb, you need to enable Developer Options, first:
1. Click on the Settings button on your remote.
2. On your screen, choose About device (Signage Stick).
3. Tap "Build Number" 7 times. You will see the message "You are now a developer!"
Now, you need to enable USB debugging
4. Go to Settings > System > Developer options, and enable USB debugging.
5. Connect Signage stick to a computer via USB
* Verify connection by running the command adb devices in command prompt window.
* You should see an output similar to: Signage stick DSN followed by the word device.
* You may see the word unauthorized instead of device which means you have not allowed USB debugging. You need to accept it by clicking on "Allow."
E. Capturing Logs
Connect your Signage Stick to your computer via the power cable, and then run the following commands in command prompt window:
Command below clear only the main and system buffers (user logs)
adb logcat -b main -b system -c
Command below then capture fresh output (ignore kernel/audit)
adb logcat -v time -b main -b system > logcat_clean.log
Many CMS providers have features that can override or interfere with the Amazon Signage Stick’s Remote Control settings menu. To prevent this, identify the feature. Different CMS providers use various terms for this functionality:
- ScreenCloud calls it "sticky mode"
- PlaySignage refers to it as "Launch on Play"
- Other providers may use different terminology
Disable the feature:
- Locate this setting in your CMS provider's configuration or settings menu
- Disable or turn off the feature
Once disabled, you should be able to access the Amazon Signage Stick Settings without interruption from your CMS app.
Note: The exact steps to disable this feature may vary depending on your CMS provider. Consult your provider's documentation or support if you need specific instructions.
Caution: Disabling this feature might affect how your CMS app behaves. Ensure that this change doesn't negatively impact your intended use of the CMS.
Device Management Questions
Yes, but you have to set up the Signage Stick with the mobile app first. Once this is done, follow the steps in After I set up my Signage Stick using the Signage Mobile App, can I still use the physical remote to manage the Signage Stick?
The message appears because the Signage Stick is still linked to its previous account in the Signage Manager.
To resolve this issue, you will need to obtain the credentials for the account that was initially used to configure the stick. Once you have these credentials, access the Signage Console Manager and sign in. Once logged in, locate the Stick in the system and remove it. This action will unlink the Stick from its previous account. After that's done, you'll be able to start fresh and re-register the Stick under your current account without any issues.
If your stick is powering off unexpectedly, make sure you're using the provided power adapter and cable. Note that not all displays support USB power.
Try the following solutions:
- Unplug the power adapter, wait 1 minute, and then plug it back in to restart your Stick.
- Make sure you're using the power cord and adapter included with your Stick.
- Let the stick sit for 10+ minutes (turned on)and see if the screen changes. Depending on your network speed, installing software updates may take longer.
- If possible, try using the Signage Stick both with and without an HDMI adapter or extender.
- Make sure that you're using a high-speed HDMI cable.
- Try using a different HDMI port.
- Try plugging the stick directly into your display instead of using a HDMI hub.
- Confirm that your display is HDCP-compliant by reviewing the video-cable section of your display owner's manual. The Signage Stick will only work with HDCP-compliant devices. If possible, try using a different display.
If the issue persists, try resetting your Signage Stick.
Please contact your content management vendor directly for help setting up an account, uploading content, or troubleshooting performance. You can also consider updating your stick to a different CMS by resetting your stick and redoing the setup process.
After reset, a Stick may remain visible on the mobile app until it is set up again. To remove a reset Stick from the mobile app, sign into the web Signage Manager Portal with your Amazon account, find the Stick you want to remove, and click the trash can icon on the very right to remove it. The Stick should disappear from both the Signage Manager Portal and the mobile app.
If you launch the virtual remote when your mobile device is not within Signage Stick’s Bluetooth range, you’ll see a “Not connected” message. In this case, you can still use the virtual remote to restart/reset your Stick if your mobile device has an internet connection. However, launching the Settings menu only works when the remote is connected over Bluetooth.
Various factors can impact the amount of time it takes for a status change to be reflected in the app, including network traffic and the number of concurrent connections to our backend. This has no impact on the Stick’s performance; you should still be able to manage the Stick with the virtual remote.
If you see the following message when tapping the virtual remote button: “Stick Not Ready: Please update via OTA if prompted, or wait 5-10 minutes if recently updated,” there are 2 possible causes:
- Your Stick is still provisioning in the background. Wait 10 minutes for it to complete and try again.
- If this doesn’t resolve the issue, your Stick may have an older version of firmware. It is designed to automatically install the latest version when available, between the hours of 2am and 5am local time. If the Stick is powered off during this time, updates cannot be installed.
Please contact customer support at signage-support@amazon.com if you are unable to ensure your Stick is powered on during window.
HDMI-CEC is a feature of HDMI that allows supported devices to communicate with each other. Amazon Signage API leverages HDMI-CEC to switch displays in and out of Standby mode and to check the status of an HDMI connection. This requires API integration by your CMS provider. Check the partner list at signage.amazon.com/cms-partners to confirm support before troubleshooting or check with your CMS software partner. It also requires displays to have HDMI-CEC enabled. Manufactures may brand HDMI-CEC differently. Examples include: Anynet+ (Samsung), Aquos Link (Sharp), BRAVIA Link, BRAVIA Sync (Sony), VIERA Link, HDAVI Control, EZ-Sync (Panasonic), CEC (Hisense, Vizio). Check your Display documentation to confirm.
Run through this checklist:
- Confirm your CMS has the Amazon Signage Remote Management API integrated — without it, scheduled power commands won't reach the TV. See partners at signage.amazon.com/cms-partners.
- Confirm HDMI-CEC is enabled in the TV settings.
- Ensure your Signage Stick is updated to the latest firmware.
- Plug the Stick directly into the TV's HDMI port — HDMI switches, splitters, and AV receivers commonly block CEC commands.
The Amazon Signage Stick does not support volume or mute control over HDMI-CEC. The bundled physical remote also does not include volume or mute buttons. For audio control, use the TV's own remote or connect a CEC-capable soundbar.
To add a new / replacement remote using the mobile app, use the “Add physical remote” option under Stick settings.
However, if you don’t have access to the mobile app (often the case if your Sticks are managed by a reseller / third party), there’s an easy solution. Manually disconnect the stick from power 3 times, letting it fully reboot each time, within 5 minutes. This process will put the Stick into remote discovery mode. Next, hold the replacement remote’s home button for 10 seconds until the LED flashes blue. Your remote should now be paired.
Note that if you are attempting to use a remote that was previously paired to another Stick, you may need to reset the the Remote first. Press and hold the Left button, Menu button (with three lines), and Back button simultaneously for 12 seconds.
Display Questions
Amazon Signage Stick supports EDID (Extended Display Identification Data) and the supported resolutions 2160p at 24/25/30/50/60 Hz, 1080p or 720p at 50/60 Hz.
Account & organization Questions
No. To be added to another company/organization, you must first leave your current one.
Note for admin users:
- Leaving your company/organization will delete it, removing all team members and unregistering all Sticks.
- Before leaving, reset all Sticks to prevent them from becoming unusable.
Mobile App:
1. Reset all Sticks in your company/organization.
2. Navigate to "Settings" (by tapping the gear icon on the bottom bar), and then tap your user profile (at the top of the screen).
3. Tap "Leave" in the company/organization textbox.
Signage Manager Portal:
1. In the Signage Manager Portal, click on the menu icon(three stacked lines) in the top left corner of the page.
2. Click on "My Team."
3. Click the exit icon under the "Actions" column of the table entry corresponding to yourself and then follow the instructions in the pop-up to leave the group.
Note: This action can only be performed by the admin user of a company/organization.
Mobile App:
1. Navigate to "Settings" (by tapping the gear icon on the bottom bar), and then tap your user profile (at the top of the screen).
2. Type the new name into the "Company/organization" textbox and tap "Save."
Signage Manager Portal:
1. In the Signage Manager Portal, click on your username in the upper right corner of the page.
2. Click "My Account" in the dropdown that appears.
3. Edit the textbox labeled "Company/Organization Name" and click "Save" when done.