Getting Started with the Mobile App
The Amazon Signage Mobile App is the companion app for iOS and Android used to set up, manage, and remotely control your Amazon Signage Sticks. It provides bulk provisioning, a Stick dashboard, a virtual remote, location and profile management, and user/organization administration.
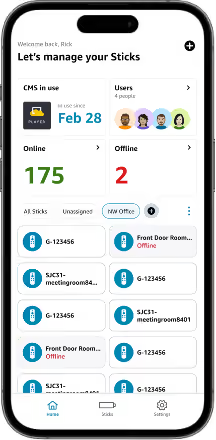
- iOS: version 14 or later
- Android: version 11 or later
The app is available in the United States , Canada , France , Germany , Italy , Spain, and the United Kingdom.
Before you start, have the following ready:
- Your Amazon Signage Stick(s) and in-box accessories (power cable, power adapter, optional HDMI extender cable)
- Optional: A TV or display withan available HDMI port (must support HDCP for protected content)
- An Amazon account
- A mobile device connected tothe internet with Bluetooth enabled
- A wireless internet connection,including your Wi-Fi name and password
- Note: The app cannot use anopen Wi-Fi network for Stick setup, so you must have a Wi-Fi network thatrequires a password.
If you also want to control your Signage Stick with a physical remote, complete setup with the app first, then add the physical remote.
Setup steps:
- Plug each Stick into a power source using the included USB cable and power adapter. You can connect theStick to a screen's HDMI port now, or connect it later (useful when setting up multiple Sticks).
- Download the Amazon Signage Mobile App on your mobile device from the App Store (iOS) or Google Play Store(Android).
- Open the Signage Mobile App:
- First-time setup: Log in with your Amazon account. This automatically creates a new company/organization with you as the admin.
- Subsequent setups: Log in with the Amazon account you used previously.
4. To add new Sticks, tap"+". The app scans for Sticks within Bluetooth range that haven't been set up yet.
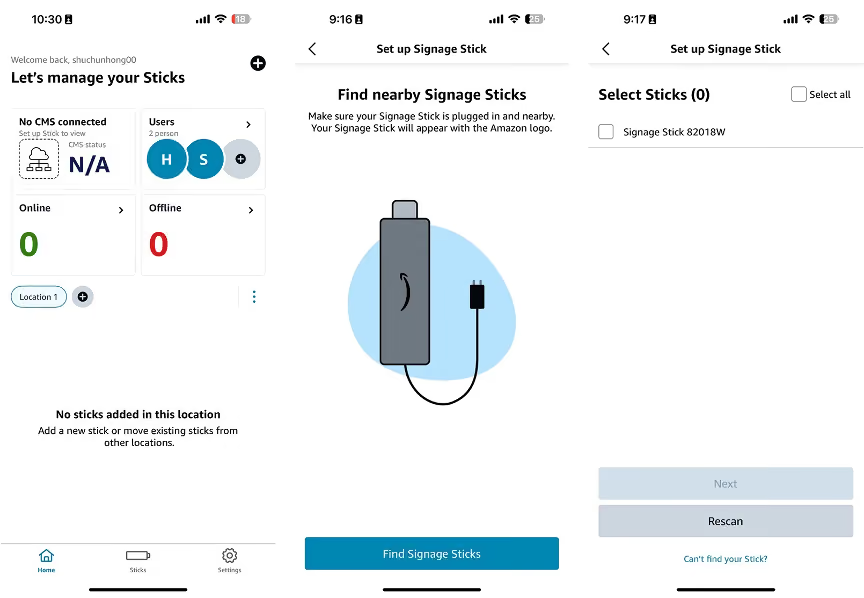
- Set up Wi-Fi and CMS settings for your Signage Sticks:
- On iOS: ensure your device is connected to the Wi-Fi network the Sticks will use. If it isn't, follow promptsto change networks.
- On Android: select the desired network from the list.
- You can add network settings manually or via saved profiles. The first time you set up a Stick, you'll use the manual method and be offered the option to save your selections as a profile.
- For subsequent Sticks, select a saved profile or tap "Skip" to input settings manually.
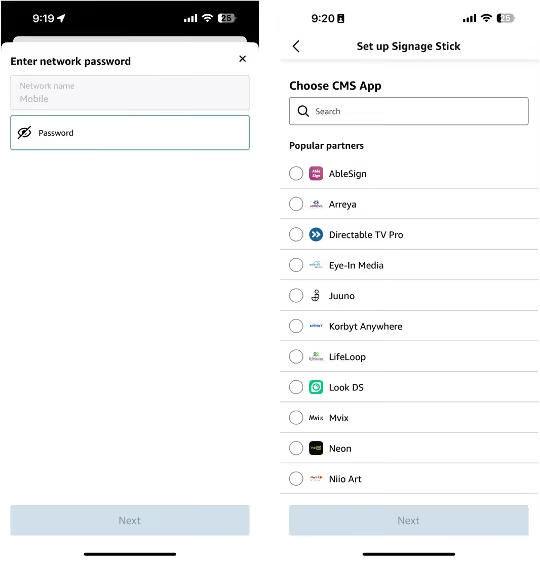
- The Stick automatically checks for and downloads OTA updates and installs your selected CMS (~5–10 minutes). If plugged into a screen, the screen shows CMS connection instructions once installation completes.
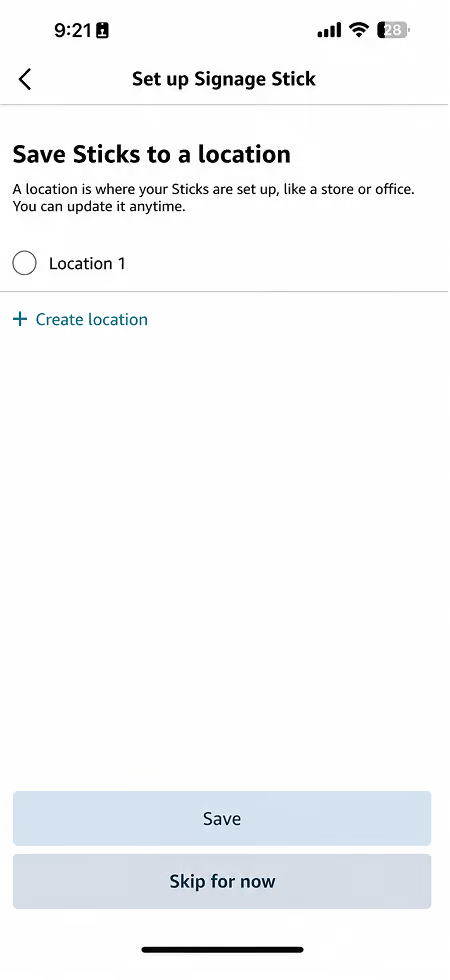
- Select a location for your new Sticks, create a new location, or skip (Sticks default to "Unassigned").
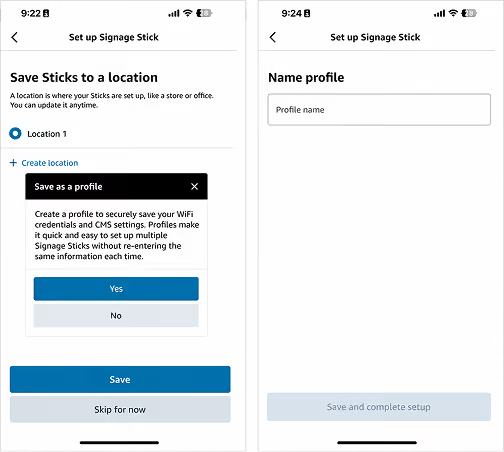
- If you manually entered Wi-Fi/CMS settings, you'll be prompted to save them as a profile.
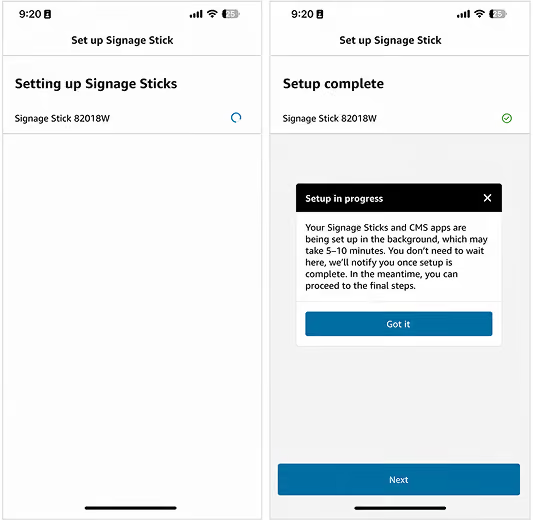
- The Stick installs the selected CMS and any firmware updates (up to 10 minutes). Once you see the "Got it" message, finalize setup and return to the homepage.
- Optional: Connect Sticks to screens (temporarily disconnect from power if needed).
- Setup is complete once you see your selected CMS on the screen connected to each Stick.
- With the app, you can set up multiple Sticks at once; with the physical remote and portal, you set up one at a time.
- With the app, you can set up Sticks before connecting to a display (just connect to power); with the portal, a display is required
- Regardless of which method you choose, you can manage your Sticks with both the app and the portal after setup.
No. To set up Signage Sticks with different Wi-Fi credentials or CMS preferences, complete the setup process separately for each combination of settings.
The mobile app only supports setup with password-protected Wi-Fi networks. To set up a Stick with an open Wi-Fi network, you must use the physical remote and Signage Manager Portal.
If you have access to a protected network but want your Stick to ultimately use an open network, use the app to set up with the protected network, then change the network after setup.
The mobile app only supports setup with password-protected Wi-Fi networks. To set up a Stick with an open Wi-Fi network, you must use the physical remote and Signage Manager Portal.
If you have access to a protected network but want your Stick to ultimately use an open network, use the app to set up with the protected network, then change the network after setup.
Setup Troubleshooting (Mobile App)
Common causes:
- Your Stick is not fully charged yet. Connect it to a power source, wait 5 minutes, then try again.
- Your mobile device may be out of Bluetooth range. Move your device within 10 feet of the Stick.
If neither works, unplug the Stick, reconnect it to power, and wait for it to fully restart before rescanning.
If your Stick is connected to a display during scanning, the first screen shows a 16-digit DSN in the top left corner.The last 6 digits are displayed in the app to identify scanned Sticks. You can also find the DSN on the outside of the Stick's packaging.
Possible causes include a lost Wi-Fi o Bluetooth connection, or the Signage Stick exiting pairing mode.
In most cases, unplugging the Stick, plugging it back in, and repeating setup resolves the issue. Verify your Wi-Fi password is correct. If setup still fails, try setting up with the physical remote and Signage Manager Portal. If that also fails, contact signage-support@amazon.com.
The app shows a Stick as online as soon as an internet connection is established. However, the Stick may still be updating firmware and installing the CMS application, which can take 10+ minutes depending on network conditions.
You'll need to perform a factory reset of the Signage Stick and restart setup from the mobile app.
Virtual Remote (In-App Feature)
MobileApp:
- On the homepage, tap the Stick you want to control.
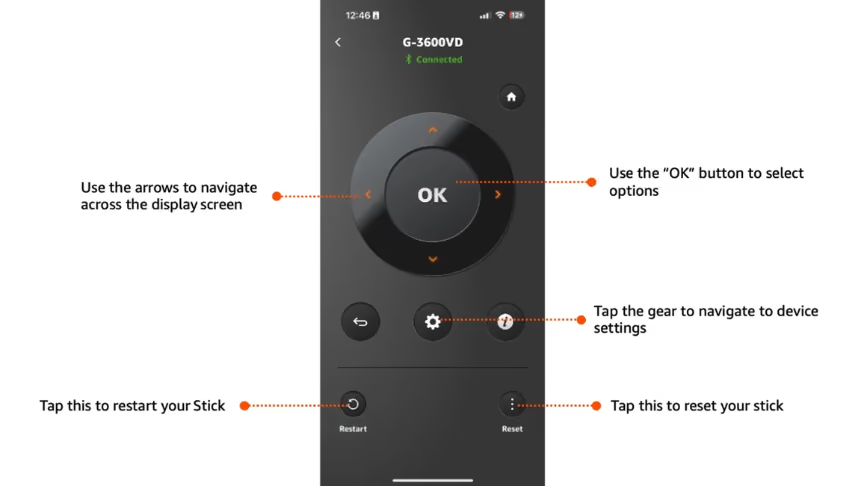
- Tap the circular remote-control icon in the bottom right to open the virtual remote.
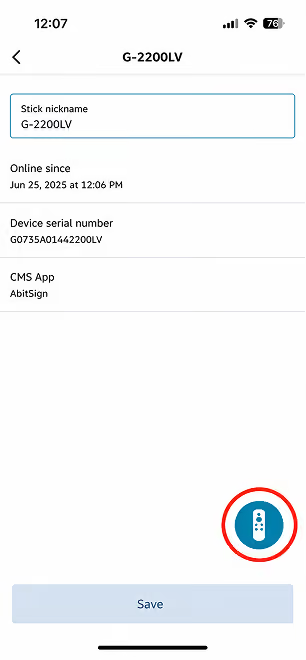
Once a Stick is set up, the virtual remote behaves the same way a physical remote does - you can launch the Stick's OS settings menu, restart, or factory reset the Stick.
Yes, you can pair a physical remote to a Stick that was set up via the app:
- Set up your Signage Stick(s) with the mobile app by following the steps outlined here.If you are setting multiple Sticks up at once, make sure they are all plugged into a power source and you are within 10 ft of the devices. The Sticks do not need to be paired to a screen for set up - they just need to be plugged into a power source.
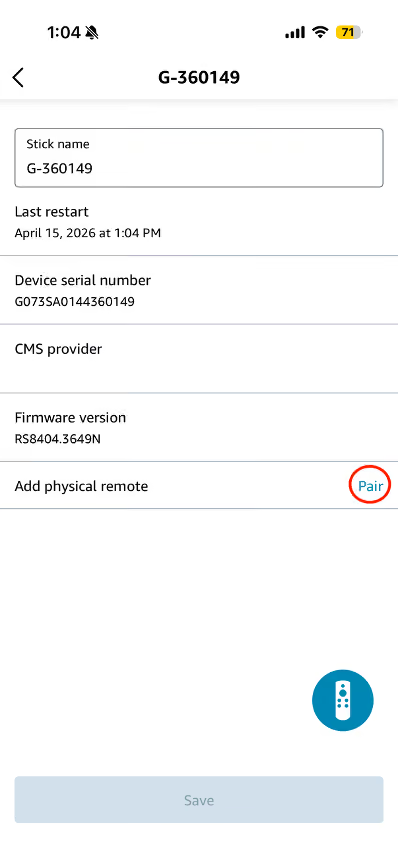
- Once the Sticks are fully setup and are visible in the app, connect the Stick you want to pair a physical remote to into a screen (to test the physical remote is connected once paired at the end). In the mobile app, select the specific Stick and click “Pair” in the “Add physical remote” section.
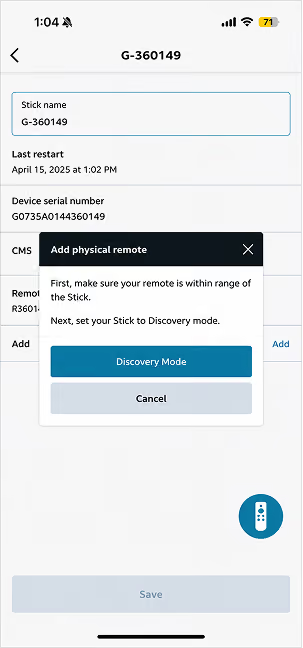
3. Click “Discovery Mode” when the pop up appears.
- Follow the instructions that appear.
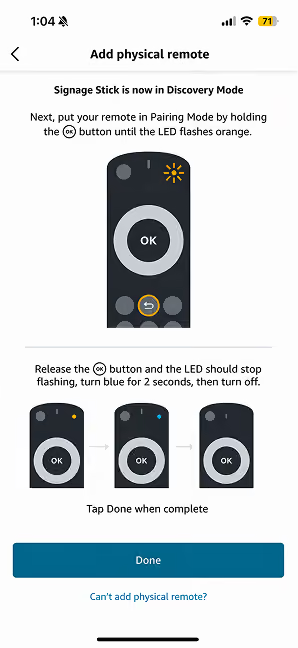
- The physical remote is now paired with that specific Stick. Make sure you label the Stick and its respective remote to prevent confusion.
- To test if the physical remote is successfully paired, click the Settings menu on the physical remote. If the remote is properly paired, the display should reflect the Settings screen.
If you see: "Stick Not Ready: Please update via OTA if prompted, or wait 5-10 minutes if recently updated" , there are two likely causes:
- The Stick is still provisioning in the background. Wait 10 minutes and try again.
- The Stick may have older firmware. Firmware updates install automatically between 2am–5am local time when the Stick is powered on and connected to the internet.
If the issue persists, contact signage-support@amazon.com.
If you launch the virtual remote when your mobile device is not within Bluetooth range of the Stick, you'll see a "Not connected" message. You can still use the virtual remote to restart or reset the Stick as long as your mobile device has an internet connection. However, launching the Settings menu requires Bluetooth connection.
If you don't have access to the mobile app (common if your Sticks are managed by a reseller or third party):
- Manually disconnect the Stick from power three times, letting it fully reboot each time, within 5 minutes. This puts the Stick into remote discovery mode.
- Hold the replacement remote's Home button for 10 seconds until the LED flashes blue. The remote should now bepaired.
If you're using a remote previously paired to another Stick, you may need to reset it first: press and hold the Left, Menu (three lines), and Back buttons simultaneously for 12 seconds.
Amazon Signage Assistant (AI Assistant)
The Amazon Signage Assistant is an AI-powered troubleshooting tool built directly into the Amazon Signage mobile app. It lets any team member - with or without IT expertise - diagnose and resolve Amazon Signage Stick issues through plain-language conversation. There is no additional cost, no signup, and no separate authorization required.
Key value:
- Reduces digital signage downtime
- Removes the need to escalate to IT, third-party vendors, or support tickets
- Puts troubleshooting in the hands of marketing, operations, or on-site staff
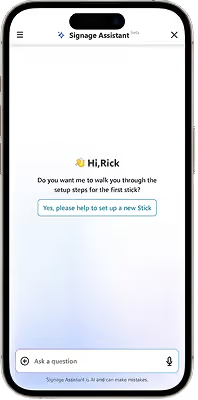
Traditional digital signage setups require specialized IT knowledge to diagnose and fix issues. When a screen goes dark, buffers, or crashes, businesses typically need to:
- Coordinate across IT, marketing, operations, and vendor teams - extending downtime
- Rely on technical expertise not available in-house
- Handle recurring pain points such as offline devices, video playback errors, and app crashes
For organizations without dedicated IT staff - and for non-technical teams in larger organizations - this creates a cycle of frustration where downtime means lost opportunities, confused customers, and wasted time.
- Ask in plain English: "Why is my screen offline?" or "Reboot the café display."
- Get instant guidance - or execute commands directly: The assistant doesn't just tell you what to do; it does it.
- Resolve issues fast: No waiting for IT or third-party vendors.
The Amazon Signage Assistant is purpose-built for digital signage. Three key differentiators:
- Trained specifically on Amazon Signage devices - Built on Amazon Signage product knowledge, years of support history, and real device interactions (not generic web data).
- Deep device integration - Directly interacts with the Amazon Signage Stick to access real-time diagnostics and execute commands. When you ask it to reboot a screen or check network status, it doesn't tell you how - it does it.
- Security built in, not bolted on - Operates within security protocols designed for digital signage. Protects device configurations, network settings, and business information while ensuring privacy and compliance.
The Amazon Signage Assistant supports Amazon Signage Stick devices in these areas:
- Setup & activation - installation, configuration, initial troubleshooting
- Device management - monitoring and remote control
- Device network management - connectivity status, Wi-Fi, and network settings
- Account & users - managing users, permissions, organizations
- General FAQ - fast answers to common Amazon Signage Stick product questions
- Small and medium-sized businesses or institutions without an IT department - Whoever is on-site when a screen goes down can handle it. No dependency on finding "the right person."
- Marketing, communications, or operations teams inside larger organizations - Fewer escalations, less back-and-forth, faster resolution. Time stays where it belongs.
Both cases share the same goal: less downtime, less friction, and one fewer thing that requires technical expertise the user doesn't have.
Existing mobile app users:
- Open the Amazon Signage mobile app.
- Tap the Amazon Assistant icon.
- Start chatting. No signup, no additional authorization needed.
New users:
Download the app first from Google Play or the Apple App Store. The app is available in the United States and Canada.
Free. Amazon Signage Assistant is available at no additional cost to Amazon Signage Stick customers.