Contact Us
Email Support Hours:
Monday to Friday 9AM to 5PM PST
Wi-Fi & Networks
Try our new mobile app! You can quickly configure one or multiple Sticks, monitor, restart, and reset your Signage Sticks on the go. Plus, use locations to organize your Sticks, create profiles to streamline setup and manage users all from within a single app.


Is your remote unresponsive during setup?
If you see the following image during setup and your remote isn't connecting, try one of these two troubleshooting tips to quickly get you back on track:
- Press and hold the Home button for at least 10 seconds until the LED rapidly flashes amber.
- Press and hold the Back button and Fast Forward button at the same time for at least 3 seconds.
After completing one of these steps, press the Play button to advance to the language selection screen.
How can I optimize my Signage Stick's network performance?
Signage Sticks have Wi-Fi 6E support for 6 GHz band connections, which prevent the overcrowding of sticks on a Wi-Fi network and allow for faster speeds, increased bandwidth, and less latency.
To get the best performance from your Wi-Fi 6E device:
- Upgrade to a Wi-Fi 6E or higher Wi-Fi Generation capable router. For larger locations, consider mesh routers for whole location coverage.
- Configure the router to serve the same network name(SSID) for the 2.4 GHz, 5 GHz, and 6 GHz band.
These changes make your Signage Stick automatically connect to the best performing band available, based on signal strength from the Wi-Fi router.
What are the Wi-Fi bands supported with the Signage Stick?
Wi-Fi 6E tri-band: 802.11 a/b/g/n/ac/ax (2.4GHz, 5GHz, and 6GHz)
Tri-band support allows for more flexible and robust connectivity options, potentially reducing interference in crowded Wi-Fi environments.
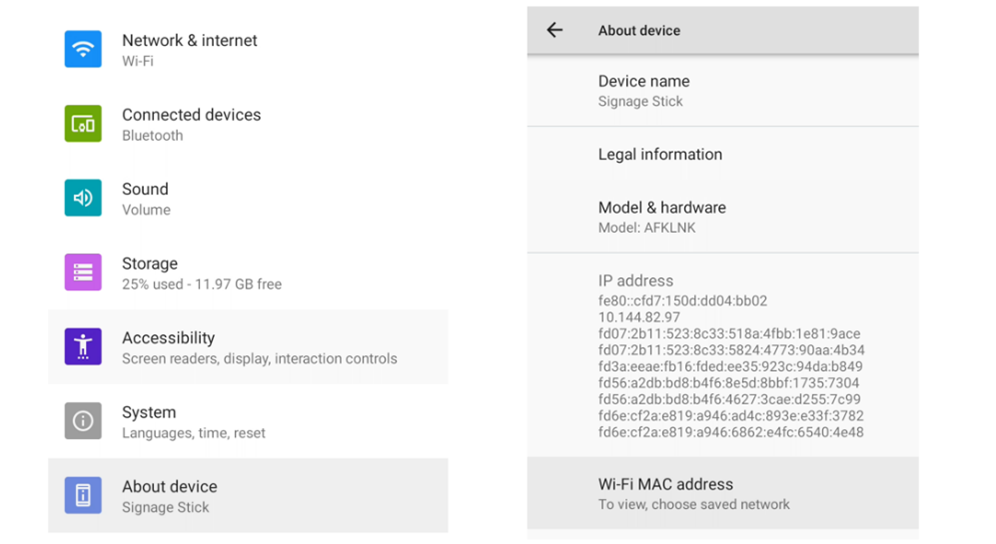
How do I get the MAC address of the Signage Stick so I can connect it to the network via MAB?
The MAC address is required to configure your network for MAB, which allows the stick to connect to the network. To connect your Signage stick to the network using MAC Address-Based Authentication (MAB), follow these steps to locate the stick's MAC address:
Using either the virtual remote or the physical remote, open settings by pressing the gear icon () and then navigate to "About Device" >>> "Device Wi-Fi MAC address."
How do I connect my Signage Stick to the Internet via Ethernet cable?
To connect your Signage Stick to the Internet using an Ethernet cable, you'll need an Ethernet adapter. Here's what you need to know:Required hardware:
- An Ethernet adapter compatible with Fire TV Stick, such as the Ethernet Adapter for Amazon Fire TV Devices
Connection steps:
- Plug Amazon Signage Stick into HDMI port in your TV.
- Plug the Micro USB end of the adapter into your Signage stick.
- Connect an Ethernet cable from your router or network switch to the RJ45 port on the adapter.
- Power on your adapter.
- Your Signage stick should automatically detect the Ethernet connection.
- If ethernet is not automatically detected, you will first need to set up your Stick using Wi-Fi, then switch to ethernet by following the steps below:
- Disconnect ethernet cable
- Restart your Stick by unplugging power and plugging back in
- Set up your Stick using a wireless network (you can use the physical remote or mobile app to complete initial setup)
- Once setup is complete, disable Wi-Fi in the Stick’s OS system settings by following one of the following 2 options
- Using the physical remote, press the gear icon, select Network & internet and turn off Wi-Fi
or
- Using the mobile app, launch the Stick’s virtual remote, tap the gear icon, select Network & internet and turn off Wi-Fi
- Plug the ethernet cable back in. A network connection will automatically be established. You can confirm by checking the Stick’s status in the Signage Manager or mobile app (it may take 1-2 minutes to update the status)